
Search all blogs
Latest posts
-
 Masking Tape: Uses, Types & How to Choose the Right One27/04/2026Read more
Discover our complete masking tape guide covering die cut, high temp masking tape, automotive and specialist tapes....
-
 Coach Screws Guide: Sizes, Uses and Outdoor Fixing Advice20/04/2026Read more
Complete guide to coach screws, including sizes, timber applications and outdoor fixing advice. Ideal for sleepers,...

How Do You Use a Caliper for Accurate Measurement - Complete Guide
What are Calipers?
Calipers are precision measuring tools used to determine the distance between two opposite sides of an object, widely used across engineering, manufacturing and DIY applications. The vernier caliper in particular is a precision tool valued for its ability to accurately measure internal dimensions, external dimensions and depth.
If you are learning how to read vernier caliper values or how to measure correctly, this guide breaks the process into a clear repeatable method covering the anatomy of vernier calipers, how to measure with caliper tools, how the vernier formula works, what least count means, how to read measurements in mm and inches and how to avoid zero error, parallax error and misalignment.

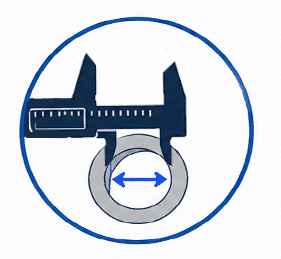
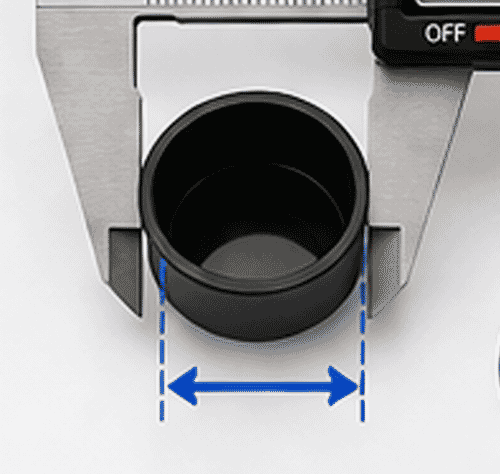
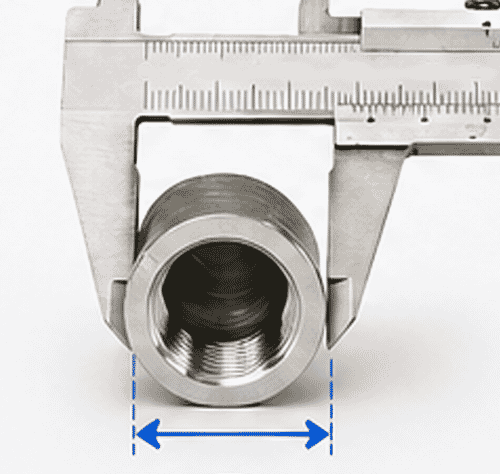
Internal Diameters
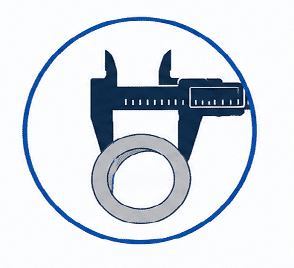
External Diameters
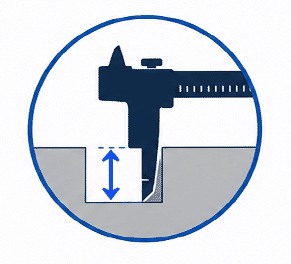
Depths
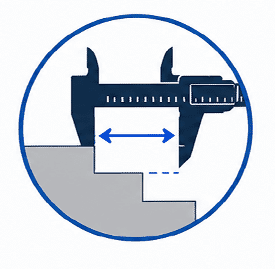
Step Measurements
Calipers are essential when working with components such as bolts, washers, tube inserts and plastic caps, where accurate sizing is critical.
Quick tip
Accuracy comes from consistency. Clean the jaws, check zero every time and read the scales straight on to avoid parallax error.
What are Calipers Used For?
Bolt and fastener diameters before installation
Washer internal and external diameters for correct fitment
Tube inserts and end caps to ensure proper sizing
Reminder: Accurate measurement helps avoid incorrect sizing, poor fitment and installation issues.
Anatomy of vernier calipers
Understanding each part of the caliper makes measuring quicker and more reliable. Use the image below as a reference then review what each component does in practice.
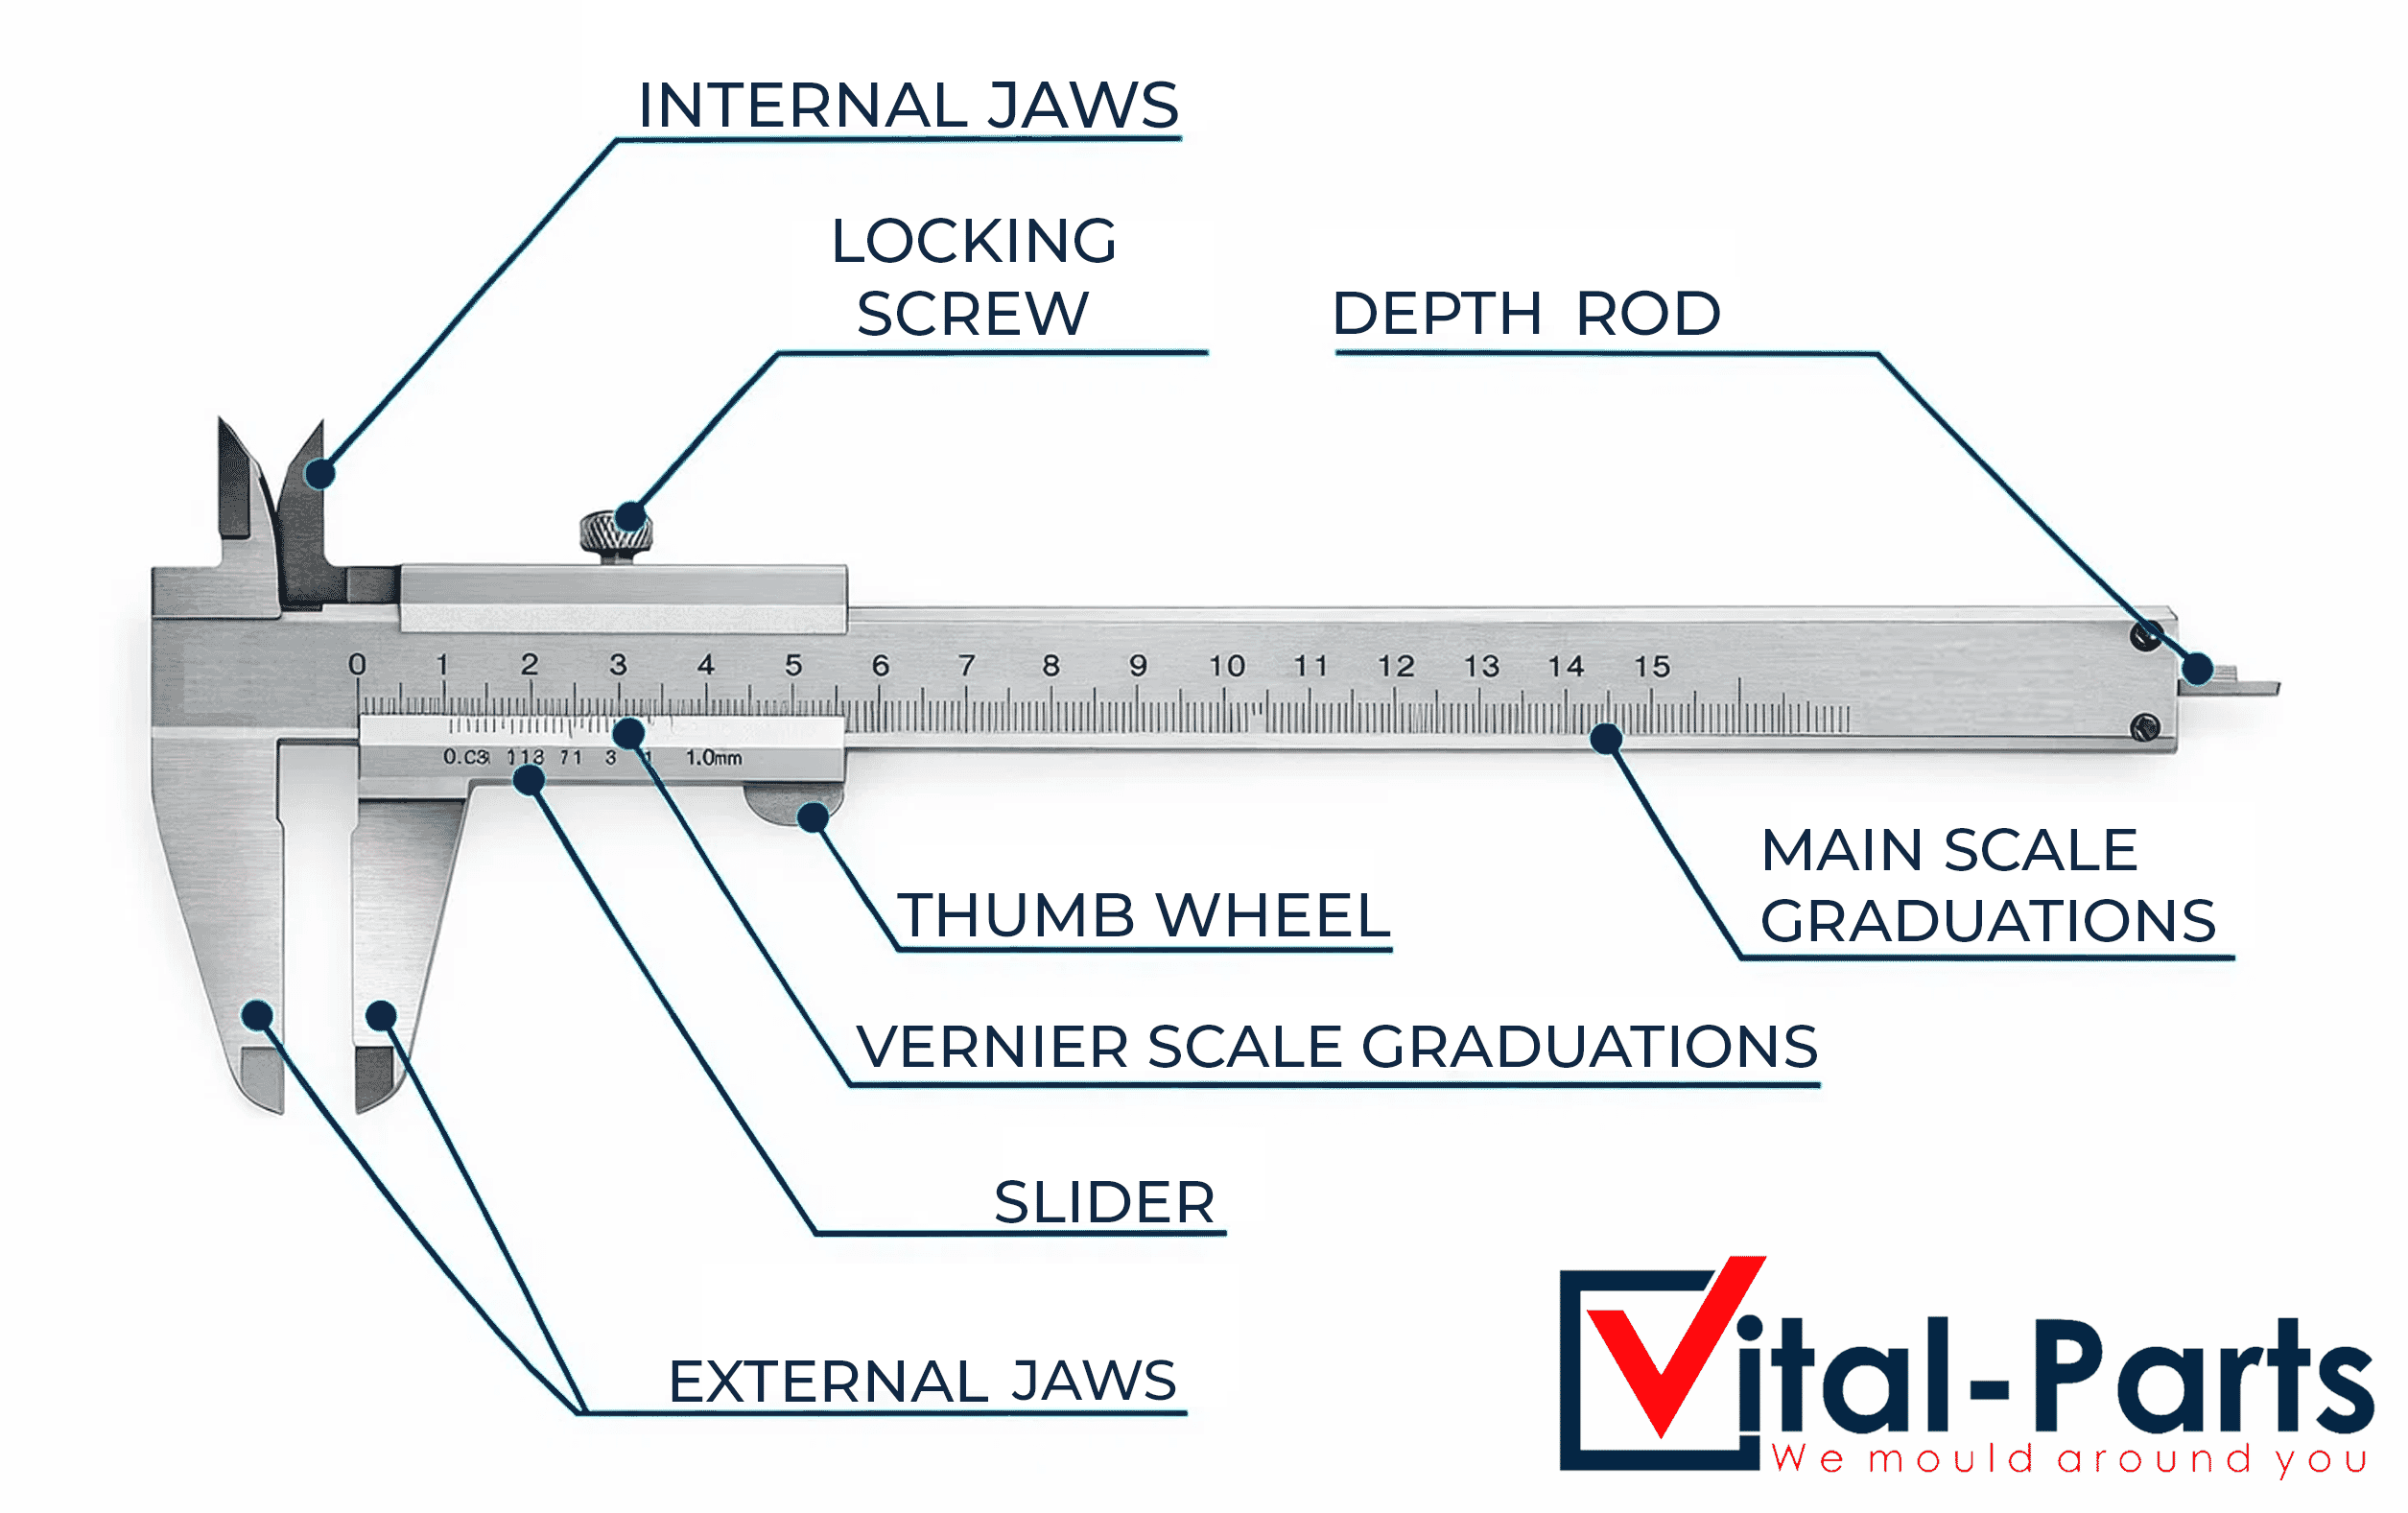
Main scale
The fixed scale on the body. This gives the whole number reading in mm and often inches on the opposite edge.
Vernier scale
The sliding scale that reveals the fraction between main scale marks. This is where precision is added to the reading.
Jaws and depth rod
External jaws measure outside sizes, internal jaws measure holes and the depth rod measures recess and hole depth.
Locking screw
Locks the sliding jaw in place so you can read the scale without the jaws drifting or shifting.
Thumb wheel
Helps you move the slider smoothly for fine adjustment. Useful for repeat readings and controlled pressure.
Anatomy of an electronic caliper
An electronic caliper also known as a digital caliper or electronic vernier caliper uses the same jaws and measuring faces as a traditional vernier caliper but it displays the measurement on a screen. This can make measuring faster in production checks and repeat inspection because the reading is shown instantly in mm or inches.
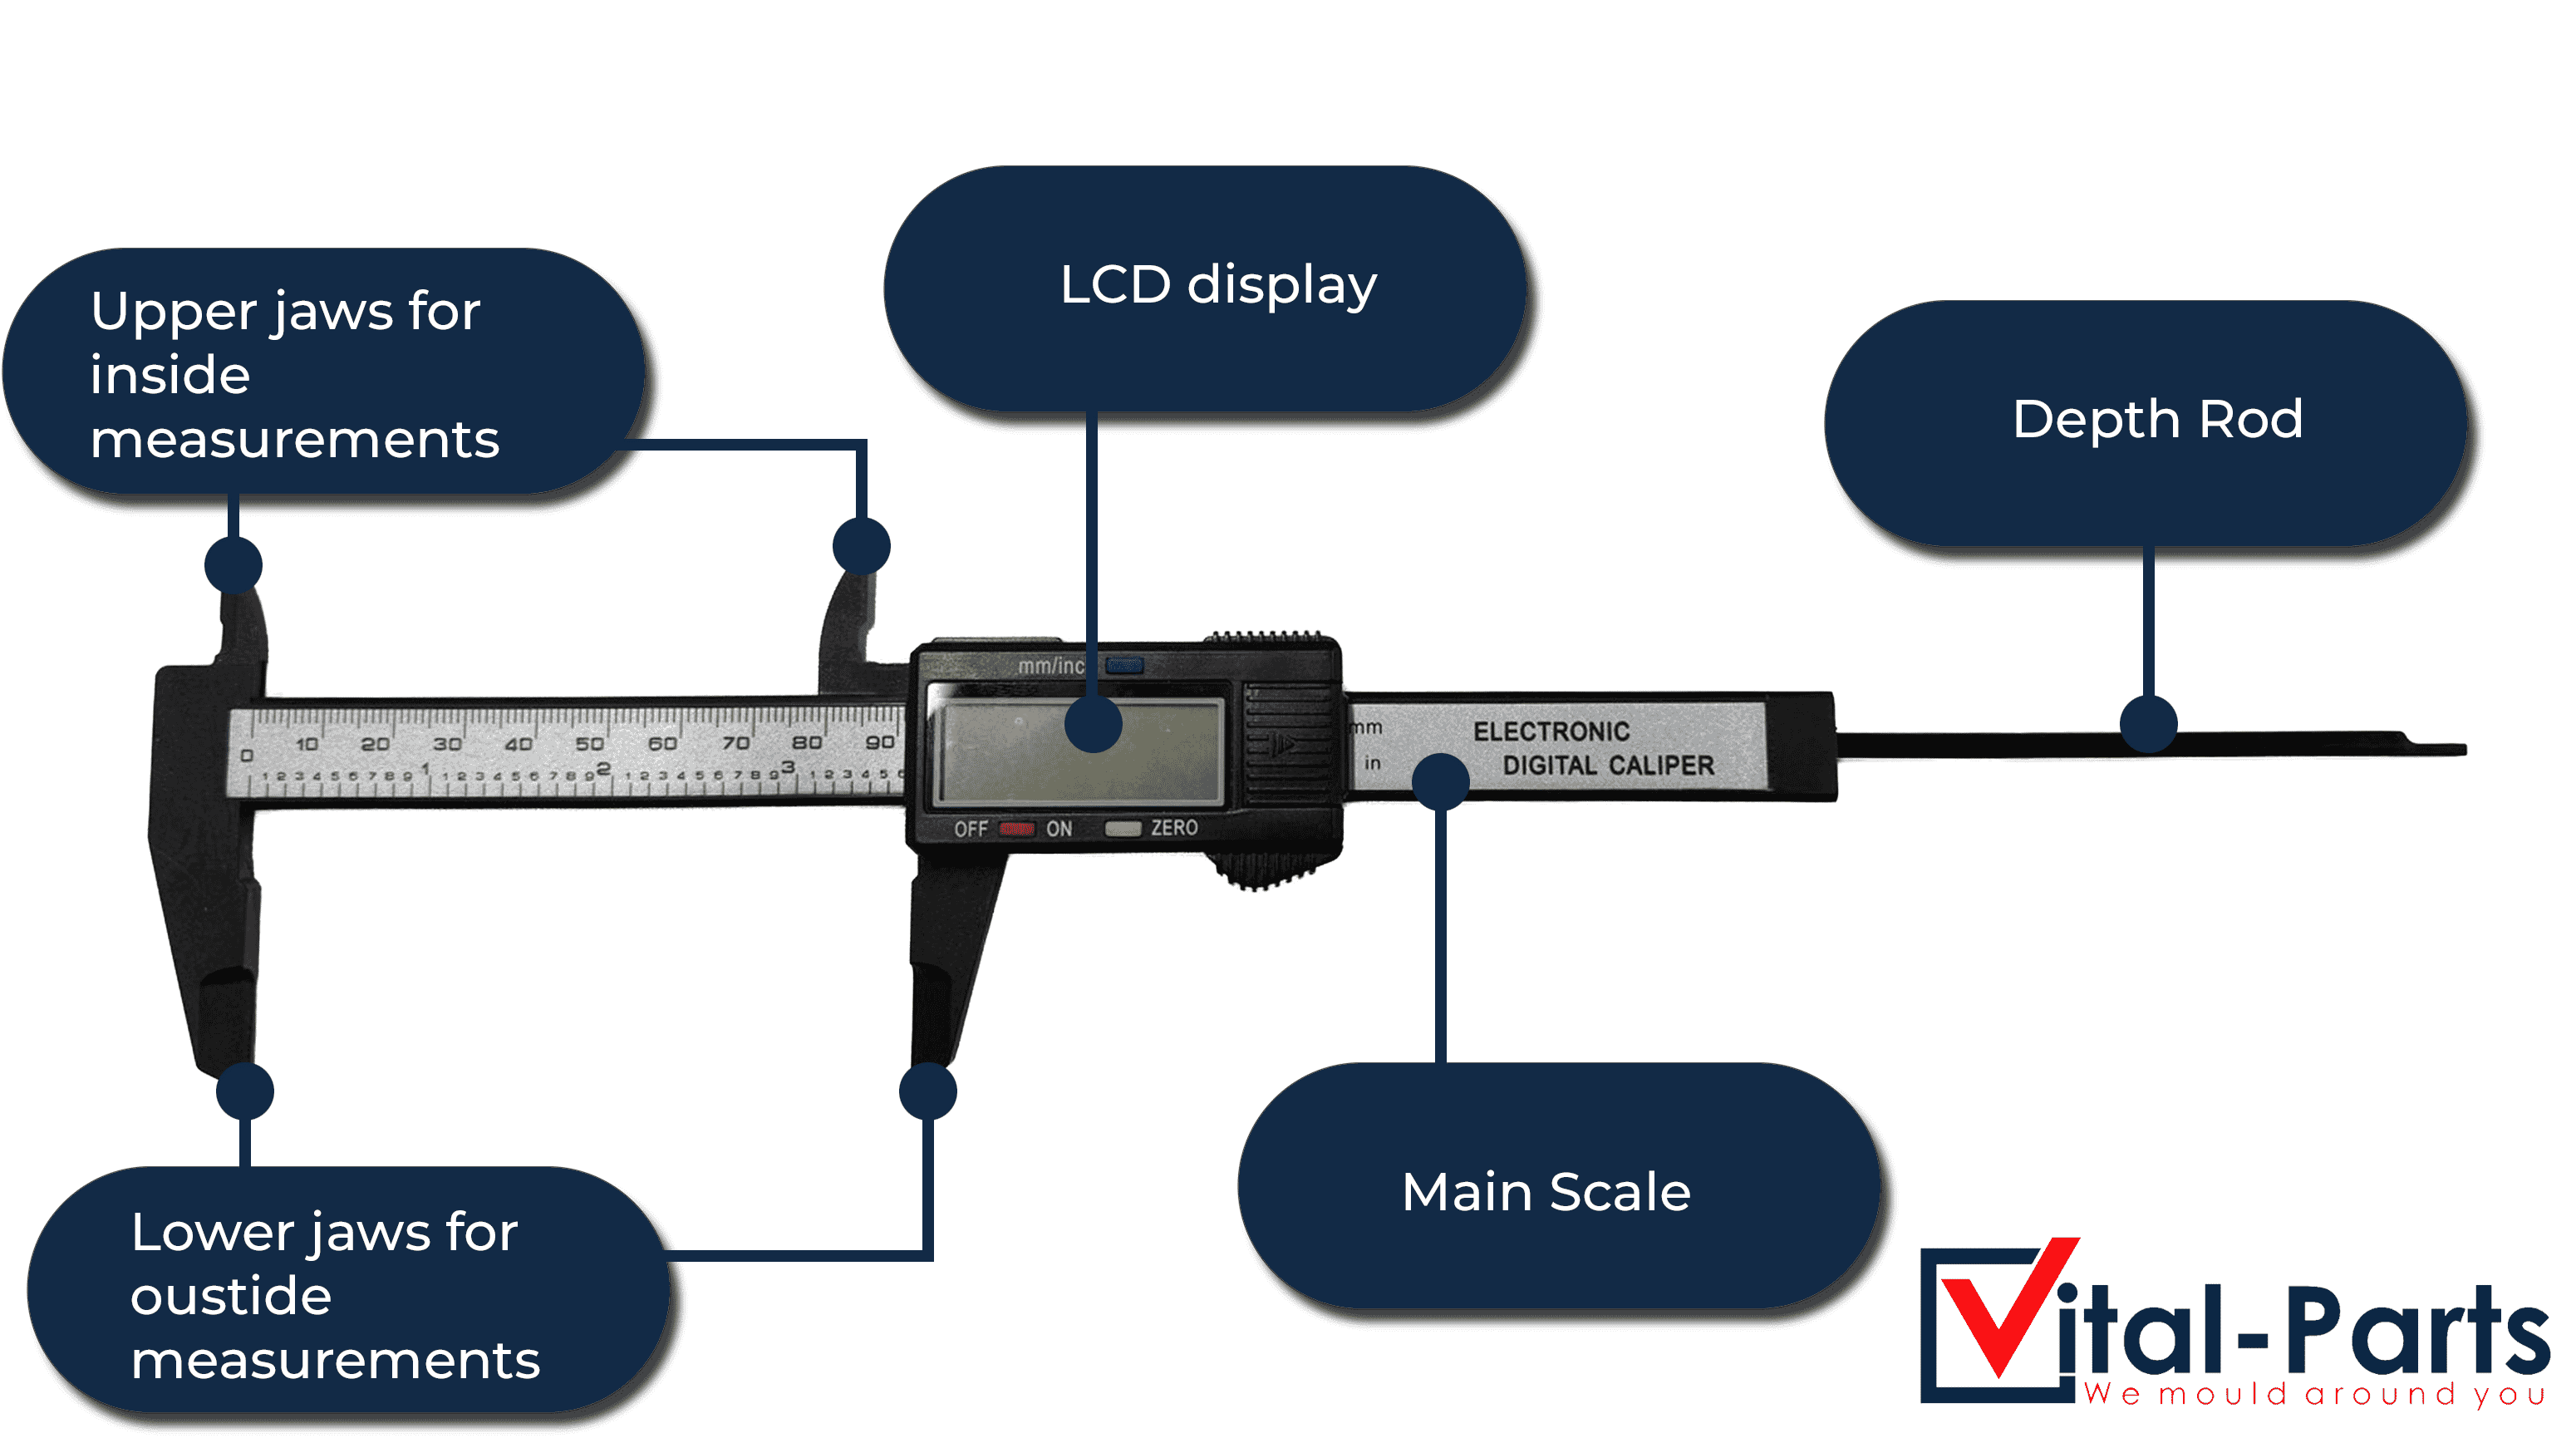
Digital display
Shows the measurement instantly and removes the need to interpret the vernier scale when you read values.
Zero and unit buttons
Lets you zero at any position and switch between mm and inches for quick comparisons and repeat checks.
Sensor and battery
The internal sensor tracks slider movement and the battery powers the display for digital caliper readings.
Anatomy of a dial caliper
A dial caliper uses a circular dial gauge instead of a vernier scale to display the fractional measurement. The dial rotates as the jaws move, making it easier to read than a traditional vernier caliper while still offering reliable precision without the need for a battery.
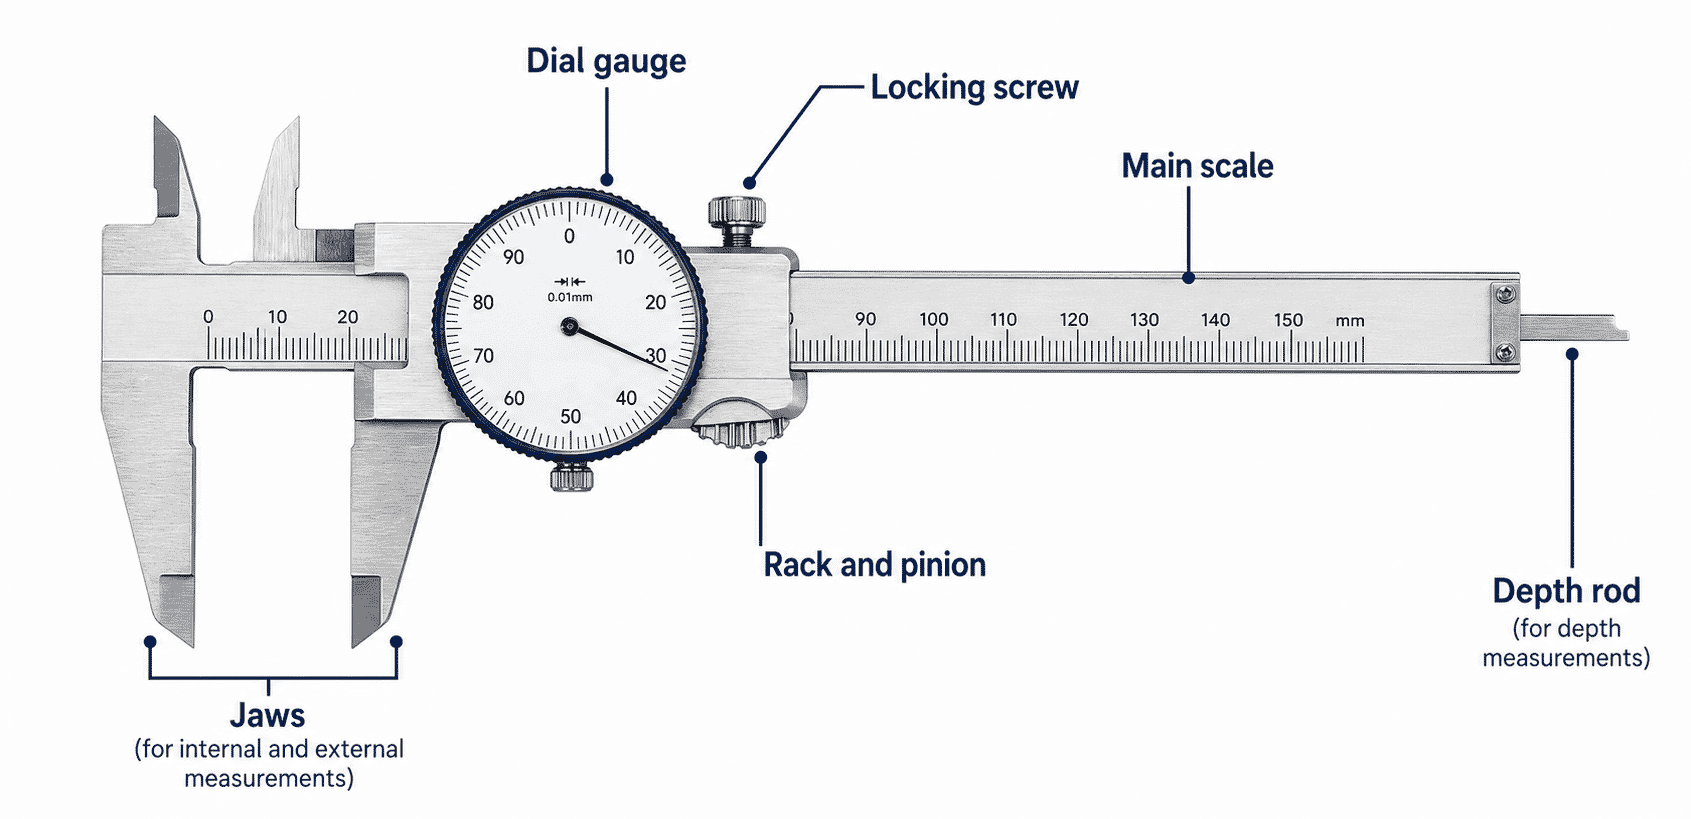
Dial gauge
The circular dial displays the fractional part of the measurement as the needle rotates around the face, eliminating the need to read a vernier scale.
Main scale
The bar scale on the body provides the whole number reading in mm or inches, which is combined with the dial reading for the full measurement.
Rack and pinion
The internal rack and pinion mechanism translates the linear movement of the slider into the rotational movement of the dial needle.
Locking screw
Locks the slider in position so the reading is held steady while you note the measurement or transfer it to a record.
Jaws and depth rod
The same jaw configuration as a vernier caliper — external jaws, internal jaws and a depth rod for measuring recesses and hole depths.
How to Use Calipers
Clean the Measuring Surfaces
Remove dust or debris from both the caliper jaws and the object before measuring.
Position the Object
Place the item between the jaws for external measurement or inside the jaws for internal measurement.
Close the Jaws Gently
Ensure a snug fit without applying excessive pressure to avoid distorting the reading.
Take the Measurement
Read the value from the display or scale clearly and accurately.
Record the Measurement
Use this measurement to select the correct component size for your application.
How to read calipers
Use the routine below each time you measure. It keeps readings consistent and helps avoid common mistakes that cause incorrect results. This is the same approach you can use to measure with caliper tools including a vernier caliper and a digital caliper.
Step 1: Check zero
Close the jaws fully and confirm the zero on the vernier scale aligns with the zero on the main scale. If it does not align you have zero error and must correct for it before measuring.
Step 2: Take the measurement
Use external jaws for outside dimensions such as shafts and fasteners. Use internal jaws for hole diameter and the depth rod for recess depth. Apply light pressure and keep the tool square to the measurement faces. This is the core method for how to measure a vernier caliper accurately.
Step 3: Read the main scale
Find the last main scale mark that the vernier zero has fully passed. This gives the whole number part of the reading.
Step 4: Read the vernier scale
Find the single line on the vernier scale that aligns perfectly with a line on the main scale. This gives the fractional part of the reading based on the least count.
Example method
If the main scale reads 3mm and the aligned vernier reading is 0.94mm then the final measurement is 3.94mm. The key is to always read the main scale first then confirm the aligned vernier line second.
Understanding the calculation
If you want the logic behind the reading use the accordion sections below. This helps when you are working with different least counts and different vernier scales.
Total Measurement = Main Scale Reading + (Sequential Vernier Marking × Least Count)
Main scale reading is the last mark passed by the vernier zero. Sequential vernier marking is the numbered order of the aligned vernier line counted from zero.
Least count is the smallest increment the caliper can measure. It is usually printed on the vernier scale and tells you the value of one vernier division.
Least Count = Value of smallest main scale unit ÷ Total divisions on vernier scale
For example if the main scale unit is 1mm and the vernier has 50 divisions then the least count is 0.02mm.
A least count of 0.02mm means each mark represents 0.02mm so you will see more division marks. A least count of 0.05mm means fewer divisions and lower resolution so the scale has fewer marks between numbered indicators.
Quick reference
- Read main scale first
- Find the single aligned vernier line
- Multiply aligned division by least count if needed
- Add main and vernier readings together
Worked examples
Use these examples to check your understanding. The process is identical in metric and imperial, only the scale units and least count differ.
How to read a caliper in mm
If the main scale shows 7mm and the aligned vernier line corresponds to 0.12mm then the final measurement is 7.12mm.
Using the formula with a least count of 0.02mm and the 6th aligned division:
Total = 7mm + (6 × 0.02mm) = 7.12mm
How to read a caliper in inches
If the main scale reads 0.275in and the aligned vernier division is 4th sequentially with a least count of 0.001in then the final measurement is 0.279in.
Total = 0.275in + (4 × 0.001in) = 0.279in
Calipers vs Micrometers: What's the Difference?
| Feature | Calipers | Micrometers |
|---|---|---|
| Measurement Range | Wide | Very precise but limited |
| Accuracy | High | Extremely high |
| Ease of Use | Easy | More technical |
| Applications | General measurement | Precision engineering |
Calipers are ideal for general sizing, while micrometers are used for ultra-precise measurements.
What products are used for calipers
A vernier caliper or digital caliper is most useful when you need to confirm exact sizes before ordering parts. Below are common categories where measuring diameter, thickness, length and fit helps you choose the correct product first time.
Bolts and screws
Use a caliper to measure thread diameter, thread length, head size and overall length so you can match the correct metric size and avoid guesswork.
Shop Bolts and ScrewsEnd caps
Measure tube outside diameter and inside diameter before buying end caps so the fit is secure and the finish looks clean.
Shop End CapsFurniture and chair feet
Calipers help you measure leg diameter, insert size and base thickness so replacement chair feet and furniture feet sit properly and protect floors.
Shop Furniture and Chair FeetCable management
Use a caliper to check cable diameter, bundle size and gland or grommet sizing so cable management parts fit correctly and reduce strain.
Shop Cable ManagementFrom Measurement to Choosing the Right Components
Once you have taken accurate measurements using calipers, selecting the correct component becomes straightforward. At Vital Parts, we supply a wide range of precision components, including:
Common mistakes and how to avoid them
Even good technique can be undermined by small errors. Use the dropdown sections below to spot problems early and improve accuracy.
Zero error occurs when the caliper does not read zero when the jaws are fully closed. This can be caused by dirt wear or damage to the jaws.
- Clean the jaws and check alignment again
- If positive zero error subtract the discrepancy from your reading
- If negative zero error add the discrepancy to your reading
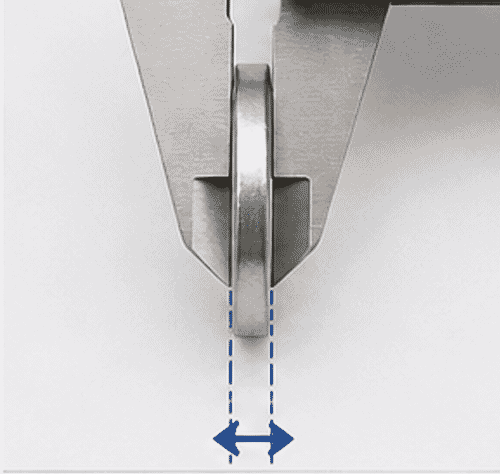
Parallax error happens when you view the scale from an angle. Always read straight on with your eye positioned directly above the scale for the most reliable alignment.
- Keep the object parallel to the jaws for external measurement
- For internal measurement ensure the jaws are seated squarely
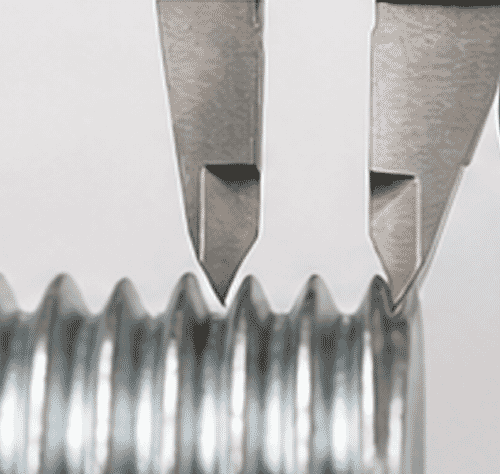
- When measuring threads avoid placing one jaw on a crest and the other on a valley
- For depth measurement keep the depth rod perpendicular to the surface
Top tip
When measuring threads ensure both jaws contact comparable points. Mixing a crest and a valley gives a misleading diameter and reduces accuracy.
Frequently asked questions
Quick checklist
- Clean jaws before use
- Confirm zero alignment
- Keep caliper square to the work
- Read main scale then vernier
- Avoid parallax and misalignment
Once you have taken your measurements, visit our site to find the exact component you need.
Related posts
-
 Guide to Masking HooksA Complete Guide to Industrial Masking Hooks for Coating, Spraying & Assembly LinesRead more
 -
 Stainless Steel Equivalent GradesCompare stainless steel grades and find the perfect match for your next project.Read more
 -
 Stainless Steel Fasteners: Tightening and Breaking TorquesUnderstanding the Limits: How to Properly Tighten Stainless Steel Fasteners Without Compromising Strength or...Read more
Leave a comment